Congratulations for all those who attended the pin-up and crits yesterday, its amazing to see the amount of effort everyone has put in.
See the blackboard announcements for more details on the collection date for your electronic submission, and the marking schedule.
Friday 19 October 2012
Monday 15 October 2012
Tips on embedding your models into pdf
The following images shows the steps to get your compatible model into adobe pdf. Those who came into the lecture will know how to get a model from 3dsMax into a format used by a pdf.


Saturday 13 October 2012
Reductions to your workload towards Assignment 3
Hi all,
In an effort to reduce the amount of workload the following points of the submission requirements will be amended.
_____________
1) 4x high quality Post Production Visualisation – Has now been changed to 2x high quality post-production visualisation and 2x high quality renders.
2) 2x animations – Students may do draft/low quality render if using 3dsmax for the purpose of saving time. You will need to ensure at least that your architecture and the elements you want to show are still visible.
3) additional representation format– You may opt to do a Real-time Rendered Environment instead of an interactive environment. This means to:
a) present an animated overview/walkthrough both internally and externally of your architecture in Crysis.
b) a near-realistic visualisation of your architecture geometrically and materially.
c) Site, context and people are expected to be populated into your Crysis environment (ie more people than just yourself), and basic video editing would be required to add sound, titles etc.
d) Moving architecture/ interactive components will not be required (unless you choose to).
Remember you will need to address the innovation clause of your assessment criteria. So ask yourself what are you doing with Crysis that 3dsmax can't do well.
______________
All other submission criteria (A1 panels, 200 word introduction as your brief, embedded models etc) will remain the same. Of course the more ambitious and organised students may still continue on with the original brief and will have that taken into account for their assessment. What i am saying is that you will not have marks penalised if you choose a real-time rendered environment over an interactive environment for example.
It will also be wise of you to re-read the questions and answers posted on our blog : http://www.arch1390-2012.blogspot.com.au/2012/10/common-and-expected-questions-for.html
GOOD LUCK!
Thursday 11 October 2012
Week 12 Task - Peer Review
Task in Studio
1) Form yourselves into groups of three and begin to assess each others draft outputs so far. Refer to the submission criteria to base yourself for this final assignment.


2) Translate your final design brief into a written literature to be incorporated into your pdfs. Think about a title to your work, a narrative on the architecture you have designed, a description of the types of spaces you are introducing, and the types of user groups for this architecture.
3) For those still struggling to place an embedded model into a pdf, today is the day that you should look into it whilst your peers are around to help.
4) This is the most crucial moment before the final submission next week. So make sure you get enough done in class, that all concerns/uncertainties are raised and all aspects of your design and presentation is discussed between you and your tutors.
5) Continue to work on all assessable outputs. DUE 19TH OCTOBER, 9AM.
NOTE: Studio Rep meeting sometime around 1pm.
Sunday 7 October 2012
Common (and expected) questions for Assignment 3
Q: What is the difference between a print and an interactive pdf?
A: The print version is simply the interactive version, with interactive elements replaced by other visualisation, or left out entirely. It all depends on how you want to design your panels.
Q: Will i need to print my A1 panels?
A: No. Print them in A3 and bring them to class as pin-ups on the side. You will be using your interactive pdfs as your main presentational devices. Nevertheless there is nothing stopping you from printing A1's if you wish.
Q: The brief asks for our designs to be in three layers, what does that mean?
A: It does not necessarily mean ripping your design out and replacing it with actual copies of your concept model, your original building, or your precedents. It is simply a check that you are not heading into arbitrary designs. What it means is that if a jury points to a part of your design and asks why was it designed this way, you are able to argue that it came out of the concept model, or that it was inspired by the other buildings you have looked at.
Q: Will i need to stick exactly to 3 x A1 panels.
A: YES. Stick with the brief. This will challenge your compositional skills and whether you have too little content or too much content.
Q: 1x Developed design proposal. How is this incorporated into the presentation?
A: Think of it as the 200 word minimum introduction to your design. You should tell your audience the nature of the design you are dealing with, the spaces incorporated in your design, and any other textual information to help the viewer interpret the design.
Thursday 4 October 2012
Green Square Library Design Competition

There is 274 other design competition entries for the Green Square Library competition which was shown today.
Will be quite helpful to have a look at the rest in your own free time here: http://greensquarelibrary.com.au/
Week 11 Task
Task in Studio - Materiality and Draft review:
1) MODELLED Drafts to be reviewed by your tutor. No work no review!
2) Create a material palette/montage that best captures the material properties (real or imaginary) you wish to explore in your final design, thinking about your research and how your material choices may add to the enrichment of your concept.


3) Continue working on your draft outputs.
Independent Task - Working towards final review before submission:
1) Next week will be your last chance for a review prior to your submission, so ensure that you are working towards a completed architecture by next week. Ideally you want to get yourself to a position before next week where your design is largely resolved and deliberated (in models rather than on paper), and when you can then concentrate on content creation and representation for the final week.
2) Produce a minimum of 1 post-production visualisation of your architecture for review.
3) Create draft outputs of all submission requirements (A1 Panels, Embedded pdfs, visualisation, animation, etc) ready for a comprehensive review by your tutor.
Thursday 27 September 2012
Week10 Task - Siting and Additional Format. Draft Outputs
Task In Studio
1) Spend no more than one(1) hour to create an expressive montage of your envisioned strategies to site your building, keeping in mind that we are not creating standalone buildings that float in mid air or on a sheet of flat plane. Use the inspirations shown from past students work in today's lecture to think about how siting can work in tandem with your building and exaggerate the conceptual standpoint of your design. You may use all mediums at your disposal (photographs, hand sketches, etc) in order to produce a landscape montage that best encapsulate the type of environment and site strategies you are aiming to explore.
2) By now you should have a firm idea in the type of architecture you are envisioning. Begin to develop your written or visual brief - the type of spaces you are creating, the types of user groups that are going to use your architecture, and any other information to form a well rounded summary of the architecture that you are creating.
3) Begin to postulate on your "additional representation techique". Write a synopsis that summarises your proposal for using this technology, justifying how it will challenge the design and representation of your architecture, and providing examples. Focus on the "why" of your choice, the benefits that you perceive the technology can bring to your project, the way in which this technology would engage with the design/decision making process compared with non-digital techniques (think back to last weeks lecture!!!!!).
Independent Task
1) Work and blog towards a completed and modelled draft of your architecture.
2) Create a draft representation of your architecture using the "additional representation technique" prescribed in the brief (Interactive environments, Augmented Reality, 3d printing/laser cutting, or interactive web interface). I encourage those aiming to engage with 3d printing/laser cutting to send a draft prototype or a segment of your design to print;- that way you can know sooner rather than later whether or not you are comfortable with this technology.
Thursday 20 September 2012
Week 09 Task - Design Development
Task For Studio
1) Get your Precedent Study/Design Proposal marked off by your tutor.
2) Position yourselves into groups of 3. You will be presenting your precedent study and preliminary concept design to each other within your group. You will organise yourselves to do this amongst your group before your tutor comes to see you. Recount to your group all aspects of your Precedent Study/Design Proposal so your group members will have a clear idea of the processes, outcomes and design decisions you have made from Week01 up until now. Discuss.
3) Continue with your concept design and incorporate both internal and external environments. Move back and forth between the hand sketch and digital modelling as you continue to develop further ideas in creating your new design.
4) Your tutors will come around and provide feedback within your group. During this time your tutor will ask for a critic's comment from each of your group members.
Independent Study
1) Continue to develop your design into a draft for discussion next week. Work from all the resources you have accumulated thus far: the nature of your original nominated architect and building, your concept model as a set of instructions, your precedents as two examples how the concept has been re-interpreted, and your new design proposal.
2) Demonstrate that you can embed an interactive 3d model into a pdf. Place your Draft 3D design into a pdf using the techniques shown in the lectures. Use this technology to complement your design - incorporate bookmarks to views, judiciously create your own views that would illustrate your building in the best light.
Sunday 16 September 2012
Lecture Attendance for Week09
Due to poor attendance recorded for the last two lectures, Week06 and Week08 lectures will not be made available on the blackboard.
Having said that, I will be showing a one off demonstration on creating live 3d models in Adobe PDFS during the next lecture. Those who would like to know how to meet this requirement for Project 2 as well as the technologies involved will need to come to the lectures this week in order to find out. No further demonstrations will be made during studio time.
Having said that, I will be showing a one off demonstration on creating live 3d models in Adobe PDFS during the next lecture. Those who would like to know how to meet this requirement for Project 2 as well as the technologies involved will need to come to the lectures this week in order to find out. No further demonstrations will be made during studio time.
Thursday 13 September 2012
Week07 Task: Establishing the basis for a concept design
Task for today:
Finalise the following:
1) You choice of two precedents, built or unbuilt. One is from your nominated architect from Project 1 and another one of your own choosing.
2) Begin a first draft of your design brief by identifying a list of building function/programme to pursue. The choice should be driven by the opportunities it would give in challenging your concepts from Project 1. It should also be different to the function of your nominated building in Project 1 (ie for Eisenman's House students, pick something else apart from residential houses).
3) Your tutors will come around and give you guidance on how successful your precedents were paired within your conceptual framework, your choice of building programme, and strategies in which forms, concepts, and programme can come together.
4) As part of your submission requirements for next week, begin to develop your design. Use the inspirations from week 6 lecture and the resources you all have at your disposal in order to go about at this. You may jump straight into modelling and manipulating your Project 1 concept model, or model and manipulate different aspects of your precedents and Project 1 building as an experimental base. You may start with basic hand sketching of ideas and combine them with a montage of different segments of your architectural, material, and spatial inspirations as well as key assemblies in your Project 1 concept model. The key is to develop your own working method in order to arrive at (and communicate with clarity) a preliminary concept design.
Independent Task:
1) Finalise all outcomes for Precedent Study and Design Proposal, due 21st September 10am.
2) Be prepared to come into class and discuss your proposal amongst your peers.
Wednesday 29 August 2012
Correction to Project 2 Brief
The Due date of Assignment 3 which was previously prescribed as 19th September has now been corrected to 19th October.
A revised brief has been uploaded to blackboard to reflect this change.
A revised brief has been uploaded to blackboard to reflect this change.
Thursday 23 August 2012
Independent Task for Week6 - Project 2 and Precedent Study
Project 2 is now up on blackboard. All students are required to read and familiarise themselves with the brief and submission outcomes.
1) Your task for the non-teaching week will be to do some self-directed study on pairing up the concepts and ideas explored in Project 1 with two additional precedents.
2) Choose a different building from your Project 1 Nominated Architect. Your selection should be based on its compatibility with the ideas and concepts you have been looking at in your Concept Model. You have already been synthesising multiple buildings at this point from looking at the representational archetypes of your nominated architect. Therefore a good way to start would be to position yourself back to Assignment 1.
3) Choose a building from a different architect. Your selection should be determined by the opportunities offered to read both buildings as a pair (refer to today's lecture) based on the ideas and concepts in Project 1. You should also choose a building that you can find enough information on.
4) Begin to source as much information as possible relating to the two precedents. Use a mixture of books, journals, and internet sources to collect relevant orthographics, perspectives, diagrams and other representational archetypes.
5) Begin to do a comparative visual analysis of the building using the concepts identified in Project 1 as a frame of reference. Pair photographs and perspectives to compare points of convergences and divergences. Create quick diagrammatic overlays on your representational archetypes where necessary to highlight these convergences and differences. See below for an example, which is a visual analysis on "Stacking" and "Bridging".
MVRDV, European Patent Office, 2005
| Kenzo Tange, Fuji Broadcasting HQ, 1996 |
 |  |
 | 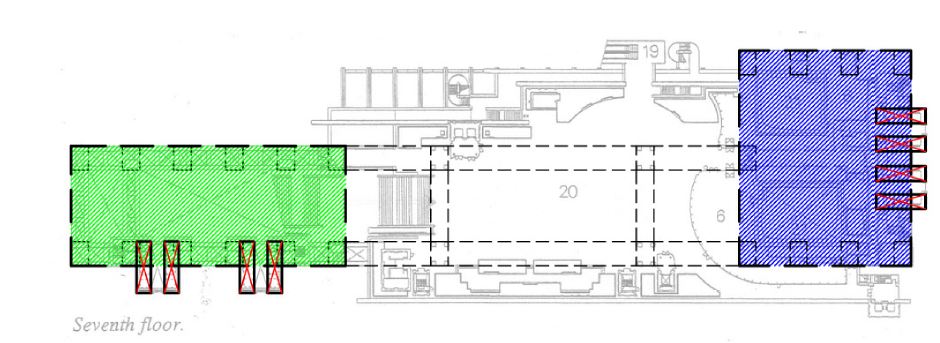 Vertical Functional Spaces separated in plan, stitched together by horizontal circulation extrusions. |
 Bridging of Stationary Space |  Circulation Bridging |
6) Start thinking about your Design Proposal and how you want to re-envision your architecture. Make a quick list of three examples of the types of buildings and functions you want to create. Your choice should not be similar to your Project 1 Nominated Building (ie people who done Eisenman's Houses should avoid small residential proposals). Rather, think of the scales your concept model can afford, the contrast between the proposal and the original Nominated Building, and how your design proposal would allow for a distinct re-presentation of the ideas and concepts you have been looking at. Blog your list to elaborate in class for week07.
Friday 17 August 2012
General Answers to Common Questions
Just a reminder that an announcement has been made on blackboard regarding the reduction of workload to your final submission, apart from that see below
Q: We have a print pdf and an interactive pdf, are they meant to be two different designs?
A: NO! all you are doing is printing off your interactive pdf through an A3 colored printer so you can pin it up in class.
Q: 2x Draft Models. Do we have to design two different versions?
A: Not exactly, 2x Draft Models means 2x iterations of your design development. In this case your sketched storyboard exercise is considered as 1x draft model as it is evidence you have engaged with the design development.
Q: The physical object, do i have to literally rebuild my digital concept model with boxboards etc?
A: NO! Think of your physical object as a physical base to set your markers on. The design of your physical object should be driven by how you want to unpack the narrative of your concept model. For example, there are a few students who are looking at notions of fragmentation, then making their physical object as a 3d jigsaw of markers or a rubiks cube like entity.
Q: Will we be demonstrating our buildAR file in class?
A: Not really, this is what the 1.5minute screen recording is for. Keep in mind that you only have 5 minutes to present your scheme so think of the 1.5 minute video as an opportunity to set how you want to communicate your concept model. We do want you to bring in your physical object w/markers on them so we can assess the physical model.
Q: Do we still need to bring in our interactive PDFS despite us having to print them off.
A: YES! put them in a USB drive. You'll be presenting on the screens, showing your interactive pdfs, and clicking on the embedded videos. The print versions are merely secondary presentation devices that people can just walk up to and position themselves to it (and also for tutors to sketch over if they need to).
Q: 2x poster layout. Is it still a composition alike our Assignment1 task?
A: Theres more flexibility in this for your part, but refer to Project1 Assessment Criteria;- "Are posters well laid out and engaging to the viewer. Are images, visualisations, and documentations produced in a high resolution and complement the conceptual/thematic standpoint of your design?" We also have had a suggestion whether you could reuse the Assignment 1 compositions and reuse/update/add/swap out those contents. The answer is yes.
Feel Free to leave a comment if you want to ask more.
Contact for my students
The same goes for my students. Email contact@matthewhunter.org for questions and feedback. Goodluck!
Thursday 16 August 2012
Contact for my students
Just letting my students know they can email me for questions and feedback for this upcoming submission. You can contact me at stephen.b.davey@gmail.com. Good luck guys, and see you next week!
Week05 Final development
Task in Studio:
2) Update: Create three realistic perspectives of your concept model in an environment (literal or imaginary). Use whatever tools you have at your disposal to achieve this. Examples can be realistic renderings in 3dsMax, montaging and image enhancements in Photoshop, or taking it to a Crysis Environment.
3) Optional: Create a realistic animation of your Concept Model. Use whatever tools you have at your disposal, whether it is a direct 3dsMax rendering or a real time capture from a Crysis environment.
4) Google and famliarise yourself with embedding videos into a pdf with Indesign.
Independent Study for Week 6 Studio:
1) Work on Assignment 2, Due Thursday 9pm next week. Electronic submission TBA on next post. Read carefully the submission criteria.
2) Digital Submission Requirement: Upload your zip file to mediafire, gamefront or a similar filesharing program by 10pm Thursday night as specified in the brief. Provide a link in your blogs.
3) In addition to all your Submission Requirements, bring your physical model to class for display.
1) Get final feedback on your developing content for presentation next week.
Update: In an effort to make your workload more manageable, and as discussed with your student reps, the 3dsMAX animation component is now an optional component of your submission. You will still be required to create a screen recording of your BuildAR model in action and incorporate an animated component in your BuildAR environment.
Update: In an effort to make your workload more manageable, and as discussed with your student reps, the 3dsMAX animation component is now an optional component of your submission. You will still be required to create a screen recording of your BuildAR model in action and incorporate an animated component in your BuildAR environment.
2) Update: Create three realistic perspectives of your concept model in an environment (literal or imaginary). Use whatever tools you have at your disposal to achieve this. Examples can be realistic renderings in 3dsMax, montaging and image enhancements in Photoshop, or taking it to a Crysis Environment.
3) Optional: Create a realistic animation of your Concept Model. Use whatever tools you have at your disposal, whether it is a direct 3dsMax rendering or a real time capture from a Crysis environment.
4) Google and famliarise yourself with embedding videos into a pdf with Indesign.
Independent Study for Week 6 Studio:
1) Work on Assignment 2, Due Thursday 9pm next week. Electronic submission TBA on next post. Read carefully the submission criteria.
2) Digital Submission Requirement: Upload your zip file to mediafire, gamefront or a similar filesharing program by 10pm Thursday night as specified in the brief. Provide a link in your blogs.
3) In addition to all your Submission Requirements, bring your physical model to class for display.
Thursday 9 August 2012
Week04 Task - Model Development, End-User testing, and Interactive PDFS.
Task for Studio - Alternating between a progressive Digital and Sketched design process:
1) Work on refining your draft Digital Conceptual Model, paying attention to animations, details and textures.
2) Start with some old fashioned ways of working. Through the medium of sketching, create a rough storyboard of ways in which you may animate your concept model. Approach it as a story of how each of your components will behave, and how your concept model would unpack into its components and reassemble as a whole.
3) Through the medium of sketching, begin to design your final physical object (the one consisting of min 4 AR markers). This physical object should work to complement your thematic and conceptual standpoint of your Concept Model.
4) With the inspirations from Week03 lecture develop a sketch storyboard to look at ways in which your physical model may work as an Augmented Reality Installation. Will you strictly control the sequence of how your Digital Concept Model is to unfold, or will you give the user a degree of flexibility in unpacking it? Will your AR markers appear one by one, or would multiple/all appear in the scene at any given moment?
5) Scan and post all of the above to your blogs.
Independent Task - Shopping, Evaluation, and Modelling (Physical + Digital):
1) Do some shopping and start on your model! Buy ample supplies of cardboard (2mm or thicker), model glue, metal ruler, and a pair of box cutter knives to successfully complete your physical object. You can get all these from the UNSW Quad Store or by making a trip down to Oxford Art Supplies. There is nothing to stop you from going more ambitious with your physical model/materials, but do not create physical objects that look flimsy, held together with tape, that lack care and attention.
2) With the sketched ideas explored in class, continue to develop your Digital Concept Model in tandem with your physical object. Drop a light into your 3dsMax environment (any mr Omni works best).
3) Pay attention to the "detect-ability" of your designed AR markers. Put your markers through an image editor to make the less fine, monochromatic, and highly pixelated. Alternatively, design a new set of markers that relate to your Digital Concept Model. This link gives best practices on making readable AR markers http://www.buildar.co.nz/buildar-pro-2/tutorial/tutorial-part-5/
4) Post a draft video of your AR object in motion. I prefer to use camstudio as a screen capture software http://camstudio.org/
5) Blog a technical evaluation of the success, problems encountered, and solutions pondered when you are transferring information from one application into another. You may write this evaluation as a short video or post a series of images with text explanation. Detecting errors ASAP will avoid any last minute hiccups and will get you thinking of other workarounds. See below for an example:
Technical Issues to consider:
Keeping the polygon count to a processable number. Think of modifiers such as optimize that may work to reduce your polycount.
Models become too bright as your light intensity is not scaled with the Build AR. You will need to toggle it down proportionately
Some modifiers you used for the purpose of animation may not work in Build AR.
Materiality should be kept as standard Mental Ray Material (nothing from Arch + Design, just standard material with bitmap textures)
AR Marker issue as explained above.
Thursday 2 August 2012
Week03 - Assignment 01 presentation
Studio Scribes and Critics:
1) Bring your printed submission to class with your relevant digital submissions in a thumb drive or a CD.
2) Each student will have 5 minutes to present their concept composition, followed by 10 minutes of review time.
3) For each presentation today your tutor will nominate 1x scribe and 1x critic. Each scribe and critic combination will be different for every presentation. Each student will have at least one go in the two roles so don't sneak out!
4) The scribe will have a notepad. The role of the scribe is to:
- Help the presenter with speeding up the initial setup of his/her presentation, for example, pinning up A3's, loading blogs, opening PDF's etc.
- Record the name of the presenter, and the critic.
- Records all the major points that the presenter has discussed and elaborated on in his/her submission.
- Ensure that the presenter does not go over 5 minutes.
- Record all the major feedback from your tutor to the presenter.
- Record all the major feedback from your critic to the presenter.
5) The critics role is to create a constructive discussion, giving opinions on the strengths and improvements. This may involve:
- Help the presenter with speeding up the initial setup of his/her presentation, for example, pinning up A3's, loading blogs, opening PDF's etc.
- Asking the presenter to clarify some aspects of his/her presentation that you think have been overlooked in the 5 minutes.
- Start a conversation based on how you regard his/her submission.
- Identifying the pros and cons of the scheme.
Independent Study - Model Refinements:
1) The key to the next three weeks is to develop and translate your 3D concept models into a 4D concept model.
2) With the comments from your tutor, scribe, and the notions presented in this weeks lecture, continue to develop and refine your 3dsMax concept model, incorporating animations and textures (real or imaginary).
3) Taking the notion of "unpacking" as used in the Project 1 brief, define two ways to split your concept model into 3 components or layers. How you further deconstruct/compartmentalize/break apart your model in this stage will depend on how you want to communicate your concept in a 4 dimensional, mixed-reality environment. Refer to the notions presented in this weeks lecture for inspiration.
Independent Study - Augmented Reality:
UPDATE: We will be using Build AR instead of Total Immersion for Assignment 2 which is a more streamlined, drop and play software. The reason for this change is for you to focus more on the design and modelling aspects of your scheme rather than getting bogged down on coding, being aware of the time constraints you are facing and the pressures involved in learning a new scripting technique in that short amount of time. (3 weeks until the next submission). An announcement will be made on blackboard regarding this and the Project 1 outline will be amended to reflect this change.
1) Go to blackboard, under resources, download the Build AR Task.
2) Create a set of 4 markers by cropping 4 aspects of your concept composition you have just submitted.
3) Import your draft components and full model into BuildAR. Use your markers to evaluate how successful BuildAR is in recognising the patterns of your concept composition.
Monday 30 July 2012
Thursday 26 July 2012
Printing reminders and montage resources - architectural rendering and illustration
A great resource for image manipulation tutorials, which you may find helpful when creating your architectural montages is http://www.alexhogrefe.com.

Also it is worth checking out:


Also a great way to render vetor graphics out of 3ds max is using the Illustrate plugin (Free 30 Trial):
http://www.davidgould.com/Illustrate/index.html
http://designreform.net/2008/10/3ds-max-hidden-line-rendering-illustrate-plugin
Please note that when compositing your architectural montages make sure the colour mode in Photoshop is CMYK and the resolution around 300dpi. Otherwise the printed montage will most likely be pixelated and will not appear the same as on your screen.
Electronic Submission Criteria
To clarify the point below outlined in the Project brief:
"On 2nd August, 10pm: Complete and submit all of the above to your blog. Upload 1 x 3DSMax, 3 x renderings, 1 x 2xA3 PDF poster layout to the submission folder. Submission procedure and details to be announced on blackboard."
1) You will need to fill a plagarism declaration before your first submission. Download http://www2.fbe.unsw.edu.au/currentstudents/plagiarismdeclaration/PlagDec.rtf and sign your name on it.
2) Compress your items above in addition with the plagarism declaration into a zip file.
3) Name your zip file with your student number followed by your surname and your first name, separated with _ . For example z1234567_Student_Joe.zip
_________________________________________________________________________________
!!UPDATE!! - It seems that there is an issue with the coursefolders ftp this week. Those who are unable to remotely log onto the coursefolders from home will need to do the next best thing - upload their .zip file into a filesharing site such as www.mediafire.com or www.gamefront.com , and provide a link to the files in their blogs. The zip file name, contents, and time of submission still applies.
_________________________________________________________________________________
4) Submit your zip file under the FBE coursefolders:
Courses/ARCH1390 - Digital Represenation\Submit\Assignment_01. If you think youve made an error, rezip your revised set with a v2 suffix, ie "z1234567_Student_Joe_v2.zip". You can only do this before the submission deadline.
Note: if it is your first time accessing the ftp server, follow the steps outlined here to get it working! http://coursefolders.fbe.unsw.edu.au/index.htm
5) Follow the rest of the submission outline and bring your hard copies to class on the next day!
Week 02 Compositional Exercise
Please Note: Nominate and vote for a student rep for your class.
Assignment 1 submission is in class next Friday, put that into your calendar!
Blogged Prerequisites:
- 2 x Folded Model
- 1 x 3DsMax draft
- collection of representation archetypes documented on your blog.
Task for Studio:
Assignment 1 submission is in class next Friday, put that into your calendar!
Blogged Prerequisites:
- 2 x Folded Model
- 1 x 3DsMax draft
- collection of representation archetypes documented on your blog.
Task for Studio:
- Throughout the studio, your tutors will look at your conceptual 3dsMax model and will discuss your next steps for assignment01.
- Stand back and look at all the resources you have at the moment (imagery research, folded models, 3dsMax).Write a 100 word max reflection on how you have translated 2D visual ideas into 3D concepts, as well as finding points of convergence between your collection of imageries, your 2 folded models, and your 3dsMax concept model. This may form the 100 word introduction for your Assignment 01 submission.
- Note: Students who have no access to a laptop will need to find a computer in the labs for the studio exercise. Do this AFTER your tutor have reviewed your week01 exercise.
- From your 6x photographs and 6x representational archetypes, select a minimum of 3x photographs and 3x representational archetypes to use as part of your collection for Assignment 1. Think about the compatibility between your choices in both a visual term and how they complement your ideas; - points of convergence - about the building.
- Unpack your 1x model into 2x ideas. A good way of dealing with this contradiction is to explore two ways of looking at your model through still shots; - a representation of a representation!
- From the insights into compositions shown in the lecture today, begin a preliminary draft of your composition. Refer to the Project 1 brief for points of consideration. You may consider compositional techniques such as montage, crop, blend, transparency/opacity, skew, distort, warp, scale, overlay, superimpose, mask.
Working towards Assignment 01:
- Continue to develop your 3dsMax concept model based on the advice given by your tutor and from the insights gained in the lecture, finessing the model into a visually digestible as well as a conceptually engaging object. Introduce real and/or imaginary materiality into your model that builds towards an understanding of the concepts.
- Work towards your final composition, reading carefully the brief for assignment01.
Electronic Submission (3rd August):
- TBA today
Thursday 19 July 2012
Week 01 Folding Exercise
Week 1 - Task for Studio
0. Project 1 Assignment Brief is up on Blackboard under Assessments. Log on Blackboard to download it!
1. Choose One Architect from below:
Complete and blog the studio task, and:
0. Project 1 Assignment Brief is up on Blackboard under Assessments. Log on Blackboard to download it!
1. Choose One Architect from below:
- Zaha Hadid
- Peter Eisenman
- Morphosis
- Kazuyo Sejima and Ryue Nishizawa
2. Post to your blog your chosen architect. Choose one of their completed buildings and post a series of photographs to your blog, including references of where the images are from. You will be using the same architect for the rest of the semester.
Folding Task
10am-12pm:
3. The main task for today is a folding exercise to get you in the process of exploring ideas thru quick hands-on approach. You will each be given two sheets of A4 paper to create two folded objects with. The paper can be folded, curved, cut or ripped, but MUST remain a single piece of paper.
4. For the first step you will create an interesting folded form based on your abstraction of the building through the photographs. An approach could be to think spatially, structurally, materially, or in terms of surfaces.
12pm-2pm:
5. For the second step you will gather a series of drawings, models, diagrams and any forms of media created by the architectural firm.
6. Interpret the media you have just gathered into your second folded form. Be selective. A good way to start could be by picking out recurring patterns, shapes, lines or motifs in the media, being aware of how elements are composed, or how your eye moves through the diagrams and drawings as you examine them.
7. Take pictures of your folded objects with your camera phone or a digital camera. Be judicious in choosing the views and incorporate both close-up details and overall shots of your folded objects.
Week 1 - Independent Task
Complete and blog the studio task, and:
1. Research further into your chosen designer using the library and online journals. You should end up with a minimum of 6 photographs, 6 representational archetypes (drawings, models, diagrams, etc) created by the firm, and a series of orthographics (plans, elevations, sections) related to your chosen building. Create a bibliography of your sources. Write a short analysis of the building based on your readings.
2. Create a 3 dimensional conceptual model in 3dsMAX based on a combination of your two folded objects. The idea is not to literally amalgamate two models together but to model qualitatively, selectively drawing out characteristics and syntaxes that appeal to you, discarding aspects that seem incompatible, and looking back at your sources to model out a thematic or conceptual standpoint.
3. Experiment with creating a draft render and a draft animation of your 3dsMAX model.
4. Blog all of the above before start of class in week 2.
Wednesday 18 July 2012
ARCH1390 O Week and Welcome
Hi all, welcome to another semester of design in ARCH1390 Digital Representation Studio. The course outline and assignment dates are now up.
Now you all know the drill for pre-studio bits and pieces, so put an hour or two aside before our first class to get the following sorted:
1) Create a new blog in blogger for the purpose of ARCH1390. Do not use the blog you have created for ARCH1101.
2) Keep note of the semesters studio blog http://arch1390-2012.blogspot.com.au/
3) We will be working with a plugin that only works with 3dsMax 2010. So go to students.autodesk.com and download the Windows 32/64 bit version of Autodesk 3dsMax 2010.
4) From the list below you will be selecting one architect to study for the rest of the semester. Throughout the course of the studio you will be creating analytical, interpretive, and "reinventive" work through unpacking their buildings and how they are represented in drawings, models, and other forms of media created by the architectural firm. Dont worry too much yet as this shouldn't be a time killer, but spend a lunch hour googling the architects below and see which ones you find more interesting as you will need to arrive at the decision by the end of class in week1:
- Zaha Hadid
- Peter Eisenman
- Morphosis
- Kazuyo Sejima and Ryue Nishizawa
5) And finally, enjoy the rest of the week, and cram as much fun as you can while it lasts!
Subscribe to:
Posts (Atom)